ios: Unable to verify Xcode and Simulator installation
Turned out there weren’t any “Command Line Tools” selected in the Xcode settings. After selecting some it worked for me. Here is how it should look like:
Turned out there weren’t any “Command Line Tools” selected in the Xcode settings. After selecting some it worked for me. Here is how it should look like:
Here is the solution to add one without create new model and view.
Go to theme/xxx/view/home/Index.cshtml
The key points to achieve it is Click picture->popup dialog->input email->check email->check slide->send email
We use the function of emailproducttofriend, which doesn’t require recaptcha,however, in order to provent from spam, we use jQuery to fake one later.
In order to avoid creating model and view, we use jQuery to post the data to server like below:
var data = {"YourEmailAddress":YourEmailAddress,

"FriendEmail":"jenny@microanalytix.co.nz",

"PersonalMessage":"Email: "+YourEmailAddress+" Team: "+team,

"send-email":"Send email"};

$.ajax({

    type : "post",

    url : "productemailafriend/5443",

    data : data,

    async : false,

});
Here is the html part to get the information, between the code, the
<div id="drag"></div>
is call the function of slide which will be used later
<div id="footy">
    <div>
        <label>Please input your Email</label><input id="YourEmailAddress" name="YourEmailAddress" type="text"/>

         <br>

        <label>Please choose your team</label>

        <select id="team">

              <option value="NRL">NRL</option>

              <option value="AFL">AFL</option>

        </select>

    </div>
    <div id="drag"></div>
    <input id="footysubmit" class="button-1" type="button" value="Send Email"/>

    <label class="footysend">We will contact you later</label>
</div>
After finish the part of html, we would work on jQuery part. The plugin used for pop-ups is jQuery-ui, which could be see from _Root.Head.cshtml
Html.AddScriptParts("~/Scripts/jquery-ui/jquery-ui.js");
Html.AppendCssFileParts("~/Scripts/base/jquery-ui.css");
Then it is called in index.cshtml as below:
$('.footapp').click(function () {
    $("#footy" ).dialog();
})
Then work on the email validation, we choose RegExp to achieve it as below
/^\w+((-\w+)|(\.\w+))*\@[A-Za-z0-9]+((\.|-)[A-Za-z0-9]+)*\.[A-Za-z0-9]+$/
However, the website crashed due to the RegEx has @ char, while nopcommerce used the Razor which is using @ character, so we need to change it to
/^\w+((-\w+)|(\.\w+))*\@@[A-Za-z0-9]+((\.|-)[A-Za-z0-9]+)*\.[A-Za-z0-9]+$/
Then we need to work on the slide, by adding the plugin of drag in _Root.Head.cshtml
Html.AddScriptParts("~/Scripts/drag/js/drag.js");
Html.AppendCssFileParts("~/Scripts/drag/css/drag.css");
However, we need to change the css and js of drag to fit our requirment:
For js, we need to add an attribute which would be employed later to activate our buttom:
function dragOk(){
            handler.removeClass('handler_bg').addClass('handler_ok_bg');
            text.text('success');
            text.attr("onselectstart","true");
            drag.css({'color': '#fff'});
            handler.unbind('mousedown');
            $(document).unbind('mousemove');
            $(document).unbind('mouseup');
        }
Then call the attribute in index.cshtml like below:
$("#footysubmit").click(function(){

   if($('.drag_text').attr("onselectstart")=="true"){
which means if it = true, it passed the validation then we can send email.
Here are some tips in drag.css, for example, adjust its height and width, update the photo by upload to server instead of using online one.
.handler_bg{
    background: #fff url("../1.png") no-repeat center;
}
.handler_ok_bg{
    background: #fff url("../2.png") no-repeat center
}
Here is the full code for index.cshtml
@{

    Layout = "~/Views/Shared/_ColumnsTwo.cshtml";

}

<div class="page home-page">

    <div class="page-body">

        @Html.Widget("home_page_top")

        @Html.Action("TopicBlock", "Topic", new { systemName = "HomePageText" })

        @Html.Action("HomepageCategories", "Catalog")

        @Html.Action("HomepageProducts", "Catalog")

        @Html.Action("HomepageBestSellers", "Catalog")

        @Html.Action("HomePageNews", "News")

        @Html.Action("HomePagePolls", "Poll")

        @Html.Widget("home_page_bottom")

    </div>

    <div class="footapp" >

        <img style="width:158px;height:158px"  src="../../Content/images/FOOTY.png" >

    </div>

    <div class="layapptop">

        <!--<div class="app">

             <a  href="products-on-promotion">

                <section class="slider-contaner">

                <ul class="slider">

                <li class="slider-item slider-item1"></li>

                <li class="slider-item slider-item2"></li>

                </ul>

                </section>

            </a>

            <div class="app_box">

                <i class="icon_a"></i>

                <div class="app_tab_con">

                    <img style="width:98px;height:98px"  src="../../Content/images/tree.jpg" >

                </div>

                <h2>Click to open gift</h2>

            </div>

        </div>-->

        <div class="server_box">

            <a class="server" href="contactus">

                <img style="width:98px;height:58px"  src="../../Content/images/ContactUs.png" >

            </a>


            <div class="server_con">

                <i class="icon_a"></i>

                <h2>1800 643 339</h2>

                <p>worktime 9:00-17:00</p>

            </div>


        </div>

        <div id="footy">

            <div>

                <label>Please input your Email</label><input id="YourEmailAddress" name="YourEmailAddress" type="text"/>

                <br>

                <label>Please choose your team</label>

                <select id="team">

                  <option value="NRL">NRL</option>

                  <option value="AFL">AFL</option>

                </select>

            </div>


            <div id="drag"></div>
            <input id="footysubmit" class="button-1" type="button" value="Send Email"/>

            <label class="footysend">We will contact you later</label>

        </div>

    </div>

</div>

<script>

    $(function() {
     $('#drag').drag();


        $('.footapp').click(function () {
            $("#footy" ).dialog();
        })

        $("#footysubmit").click(function(){

            if($('.drag_text').attr("onselectstart")=="true"){

                var team = $("#team").val();

                var YourEmailAddress=$('#YourEmailAddress').val();

                if(YourEmailAddress==''){
                    $('#YourEmailAddress').focus();
                    alert("Please input your Email address");
                }else{
                     if(YourEmailAddress.match(/^\w+((-\w+)|(\.\w+))*\@@[A-Za-z0-9]+((\.|-)[A-Za-z0-9]+)*\.[A-Za-z0-9]+$/)){
                            var data = {"YourEmailAddress":YourEmailAddress,

                            "FriendEmail":"jenny@microanalytix.co.nz",

                            "PersonalMessage":"Email: "+YourEmailAddress+" Team: "+team,

                            "send-email":"Send email"};

                            $.ajax({

                                type : "post",

                                url : "productemailafriend/5443",

                                data : data,

                                async : false,

                            });

                            $(".footysend").show(0.5);
                            $('#YourEmailAddress').val("");

                     }else{
                         alert("Please input correct Email address");
                         $('#YourEmailAddress').focus();
                         return false;
                     }

                }

            }else {
                alert("Please slide to unlock")
            }


        });

    })

</script>
Here is the part of css we updated for the feature
#footy{
  display: none;

  text-align: center;

}

.footysend{
  display: none;
}
.footapp{
  width: 220px;
  height: 140px;
  position: fixed;
  z-index: 99;
  right: 20px;
  bottom: 300px;
}
For new Jquery plugin to nopCommerce,find the _root.head.cshtml file in Nop.Web\Views\Shared\ and add the following codes
Html.AppendScriptParts(@Url.Content("~/Scripts/public.ajaxcart.js"));
Html.AppendScriptParts(@Url.Content("~/Scripts/public.common.js"));
Html.AppendScriptParts(@Url.Content("~/Scripts/jquery-ui.min.js"));
Html.AppendScriptParts(@Url.Content("~/Scripts/jquery.validate.unobtrusive.min.js"));
Html.AppendScriptParts(@Url.Content("~/Scripts/jquery.validate.min.js"));
Html.AppendScriptParts(@Url.Content("~/Scripts/jquery.unobtrusive-ajax.min.js"));
Html.AppendScriptParts(@Url.Content("~/Scripts/jquery-1.7.1.min.js"));
If it says $ is undefined, you probably have used Html.AppendScriptParts
For css, use
Html.AppendCssFileParts(@Url.Content("~/Content/smoothness/jquery-ui-1.8.17.custom.css"));
The path to upload jQuery code is /Script
Here is the problem, after changing the content of categories, the height of hover categories changed as well, which would effect the layout of banner

go to
Nop.Web/Themes/CustomMicroAnalytix/View/Catalog/TopMenu.cshtml
 Nop.Web/Themes/CustomMicroAnalytix/Content/styles.css
To fix the bug of table css in product full description, I add a plugin in tinyMCE as below:
To add the Fullpage Plugin to the tinyMCE editor just edit:
/Administration/Views/Shared/EditorTemplates/RichEditor.cshtml
And add “fullpage” to plugins: [..] and also to toolbar: “..”
inymce.init({
        selector: "#@ViewData.TemplateInfo.GetFullHtmlFieldId(string.Empty)",
        height: 350,
        width: 790,
        valid_children : "+body[style],-body[div],p[strong|a|#text]",
        plugins: [
            "advlist autolink lists link image charmap print preview anchor",
            "searchreplace visualblocks code fullscreen fullpage",
            "insertdatetime media table contextmenu paste@(canUploadPictures ? " jbimages" : null)"
        ],
        toolbar: "insertfile undo redo | styleselect | bold italic | alignleft aligncenter alignright alignjustify | bullist numlist outdent indent | link image@(canUploadPictures ? " jbimages" : null) | fullpage",
        //"relative_urls" required by jbimages plugin to be set to "false"
        //but in this case it'll break existing links (e.g. message template tokens)
        relative_urls: true
SELECT * from wp_posts WHERE post_type ='custom_css';
Then you will find it
    /*
You can add your own CSS here.

Click the help icon above to learn more.
*/
.by-author, .comments,.date{
    display: none;
}
#search-8{
float:right;
}
#prisna-google-website-translator-8{
float:left;
margin-right:50px;
}
.footer-socket-area{
display:none
}
#buffercode_banner_upload_info-3{
float:left;
margin-right:10px;
}
#buffercode_banner_upload_info-5{
float:left;
margin-right:10px;
}
#text-9>.textwidget>a:hover {
 color:green
}
1.bloginfo()
bloginfo(‘name’) display the name of blog
bloginfo(‘description’)
bloginfo(‘url’) the website url
bloginfo(‘template_url’) display the template of wordpress
<?php href="<?php bloginfo('url'); ?> title ="<?php bloginfo('description'); ?>" <?php bloginfo('name') ?> ?>
2.wp_title()
wp_title(‘separator’.echo,seplocation)
separator :>>
echo: true will display the tiel, false will return the title as php parameter
for example:
<title>
<?php wp_title('|','true','right');?>
<?php bloginfo('name'); ?>-<?php bloginfo('description'); ?>
</title>
3.
wp_get_archives()

wp_get_archives('type=monthly&format=html&show_post_count=1&limit=10')
type=monthly ,could be replaced by yearly, daily, weekly
show_post_count=1 display number ,1 means bool
limit=10 means the display max is 10
4.
wp_list_categories()

wp_list_categories('orderby=name&order=ASC&show_count=1&use_desc_for_title=1&feed=RSS&exlude=2,5& number =10')
show_count=1 means display number of posts
use_desc_for_title=1 means use the description to create a hyperlink
feed=RSS creates a “RSS” hyperlink
exlude=2,5 only display id =2 and 5 categories
number=10 only display the first 10 categories
5
get_the_category()
cat_ID: current category ID
cat_name: current category name
category_description: current cateogry descripiton
category_count: current category posts number
6
the_category()
7
category_description()
echo category_description(get_category()->cat_ID)
8 is_home()
to check whether the current page is the homepage for the blog or not. the return is bool. true or false
<?php if(is_home()){//the content to display in homepage}else{//the content to display not in the homepage} ?>
9.is_archive()
check if the page is archive page
10.is_page()
check if the webpage is the page of blog
11.is_paged()
check if the page has if exist, return false
12.
is_page_template()

is_page_template('guestbook.php') ///to chekc guestbook.php used template or not
13.is_single()
is_single('808';)
14.is_category()
return bool
15.is_tag()
16.is_date()
17.
is_day() is_mounth() is _year()
18.is_author()
19.is_admin() under the panel of admin
20.get_bloginfo()
21.query_posts()
query_posts("order=ASC&showposts=10&offset=1&orderby=date&posts_per_page=5")
showposts=10 display 10 posts
offset=1 display the latest post
posts_per_page=5, display 5 posts per page
for example
<li><h2>Latest posts</h2>
    <?php query_posts('showposts=5&offset=1'); ?>
    <ul>
        <?php while(have_posts()):the_post(): ?>
        <li><a href="<?php the_permalink(); ?>" title="<?php the_title(); ?>" </li>
        <?php endwhile ?>
    </ul>
</li>
22.get_posts()
<?php
$lastposts=get_posts('numberposts=5');
foreach($lastposts as $post) :setup_postdata($post);
 ?>
<h2><a href="<?php the_permlink(); ?>" id="post-<?php the_ID(); ?>" ><?php the_title();?></h2>
<?php the_content(); ?>
<?php endforeach; ?>
23.
wp_list_cats()
24.get_calendar()
25.
wp_list_bookmarks()
wp_list_bookmarsk('title_li=&categorize=0&orderby=rand&include=41,40,37,54')

title_li=&categorize=0 means not display the the bookmarks title but display the category

orderby=rand rand means randomly, could be replaced by id,url,anme

include=41,40,37,54 means display the categoryid =41,40,37,54
26.
wp_list_pages('title_li=&sort_column=menu_order&include=12,25,37,54&depth=1&')

title_li= means the name of these all pages, if null, it won't display name

sort_column=menu_order means the order of pages, could be replaced by post_title, post_date, ID

depth=1 means display parent page, 0 means display all pages, -1 displayg all pages
27.
wp_tag_cloud()

wp_tag_cloud('smallest=8&largest=22&number=30&orderby=count')

smallest=8 means tag font size is 8 (least tags)
largest=22 means tag font size is 22 (most tags)
28.wp_register()
29.wp_loginout()
30.
wp_logout_url()
wp_login_url()
<a href="<?php echo wp-logout_url(); ?>" >
<a href="<?php echo wp-login_url(); ?>" >
31.wp_meta()
32.wp_recent_posts()
33.get_recent_comments()
34.
wp_get_post_tags()

if(is_single()){
    $keywords="";
    $tags=wp_get_post_tags($post->ID);
    foreach($tags as $tag){
        $keywords=$keywords.$tag->name.",":
    }
    echo $keywords;
}
35.
single_cat_title() single_tag_title()

<?php $str=single_cat_title() echo $str ?>
<?php $str=single_tag_title() echo $str ?>
36.get the post here
<?php if(have_posts()) ?>
<?php while(have_posts()):the_postt() ?>
37.the_title()
<?php the_title('before','after',display); ?>
1.The way to install xshell is similar with other software, however, I changed to securecrt later

2.choose network bridged
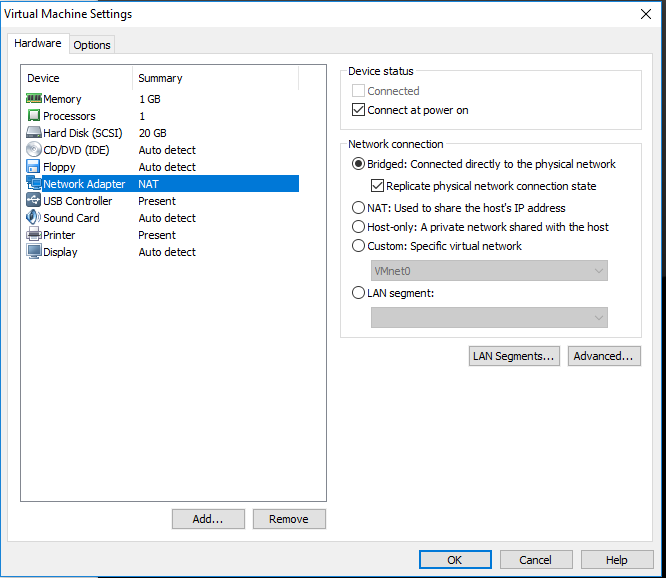
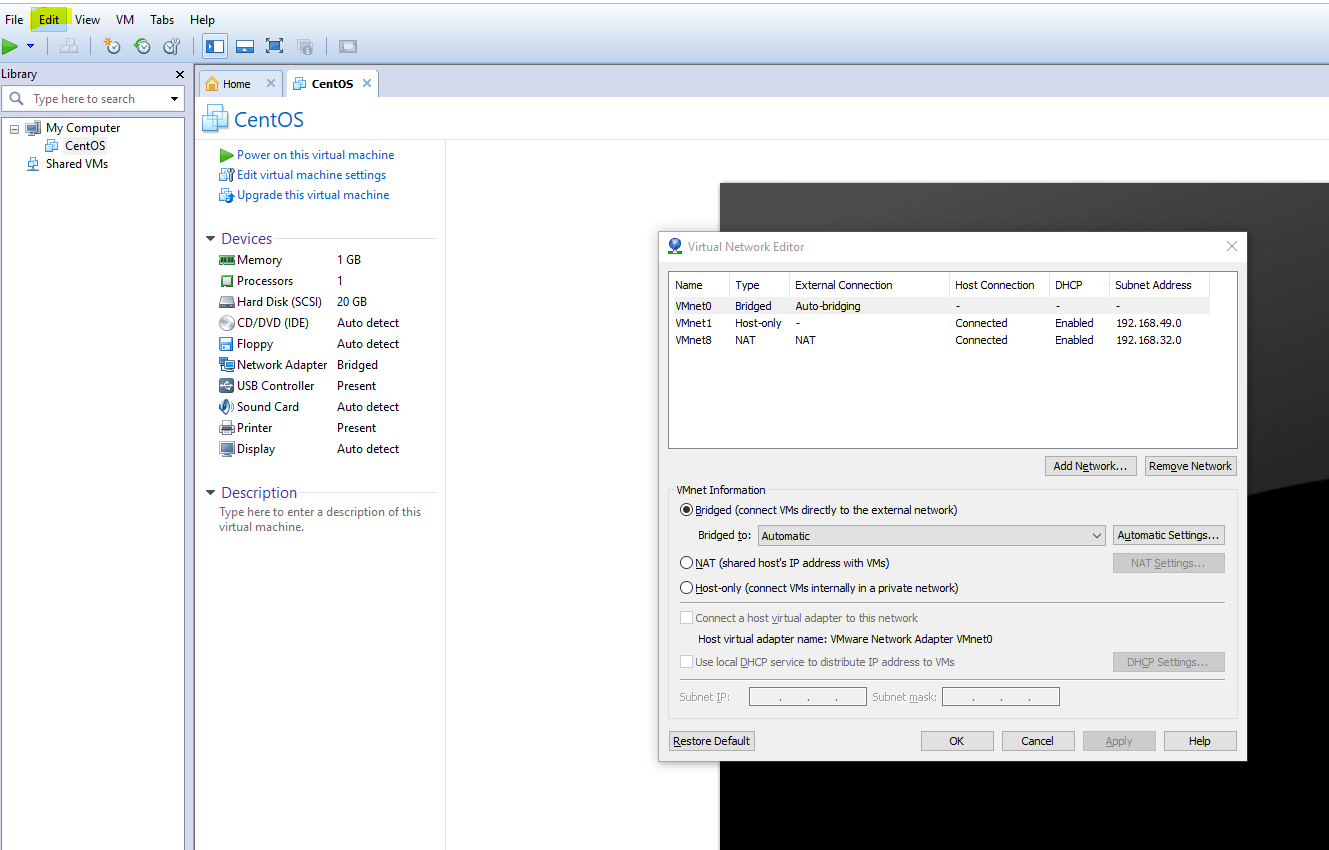
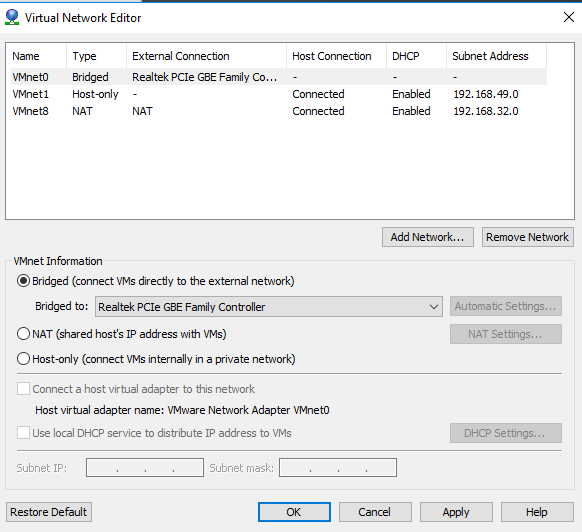
3.Go to Edit and choose the edit->Virtual Network edit

4.then update as below:
5.make sure the method could work by checking the network of real PC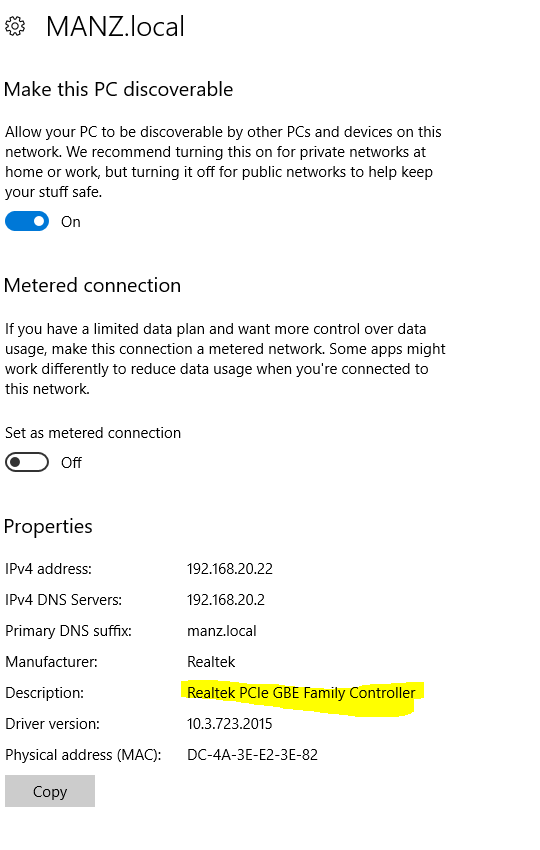
Double check the setting of IP,make sure the IP is obtained automatically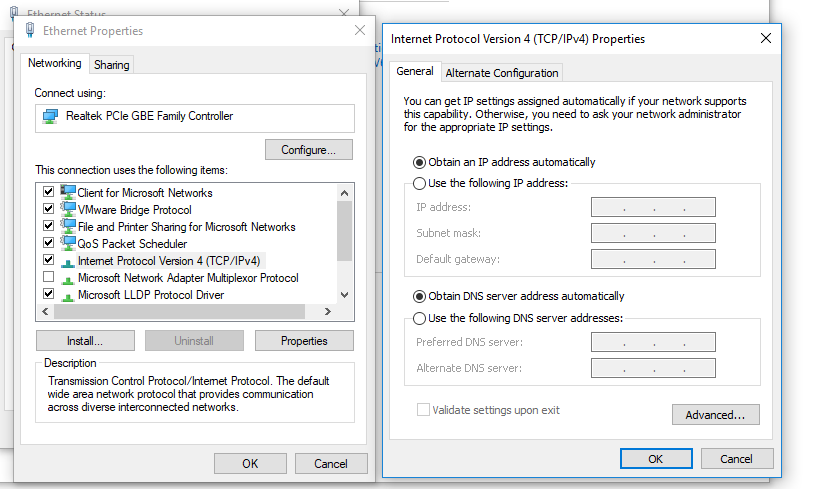
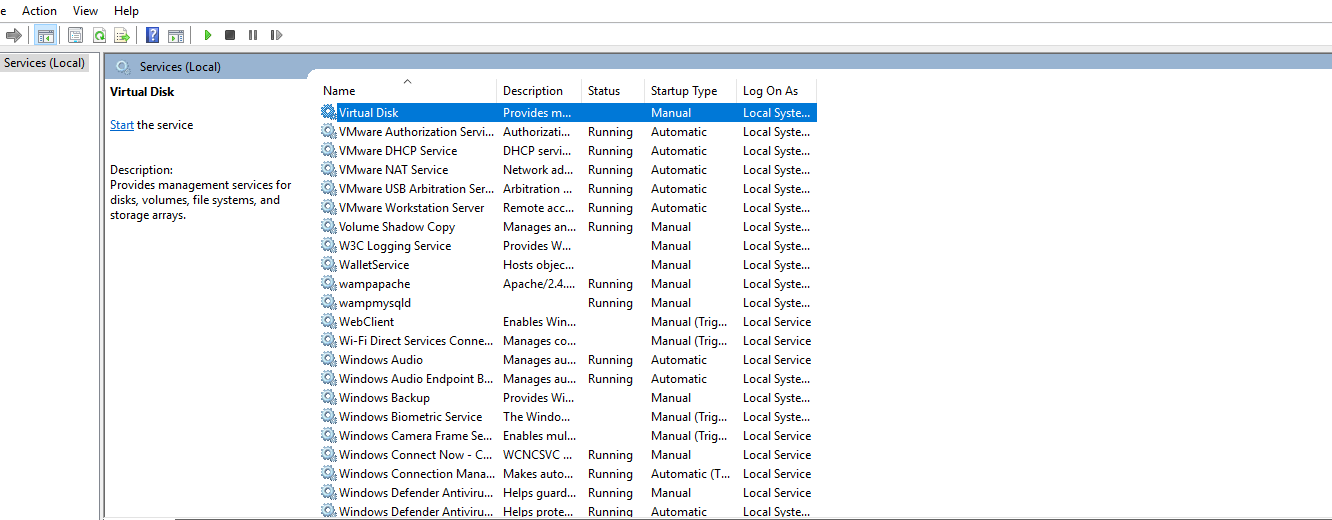
6.make sure the service is running
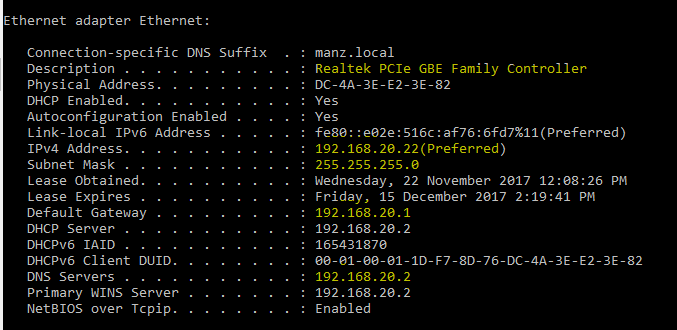
7.check the ip in CMD,the highligt parts are important,which will be employed later for eth0
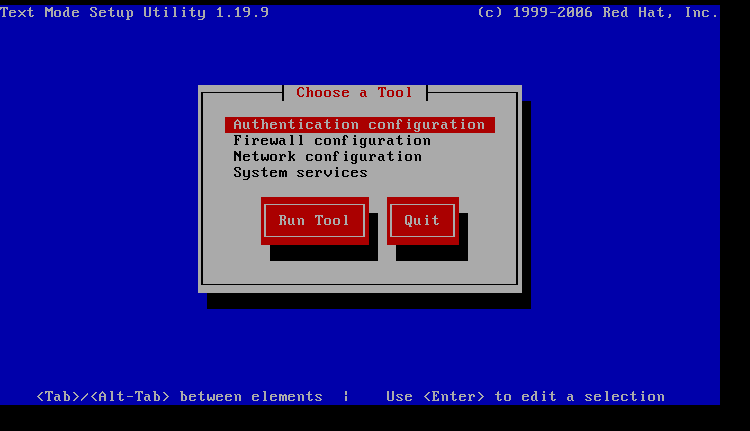
8.start linux and input “setup”, then choose “Network configuraton“ then choose Run Tool
9.then choose “Device configuration” then keyboard “enter”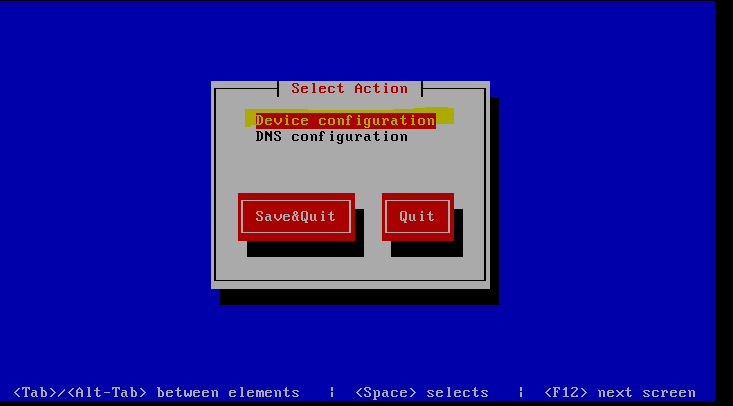
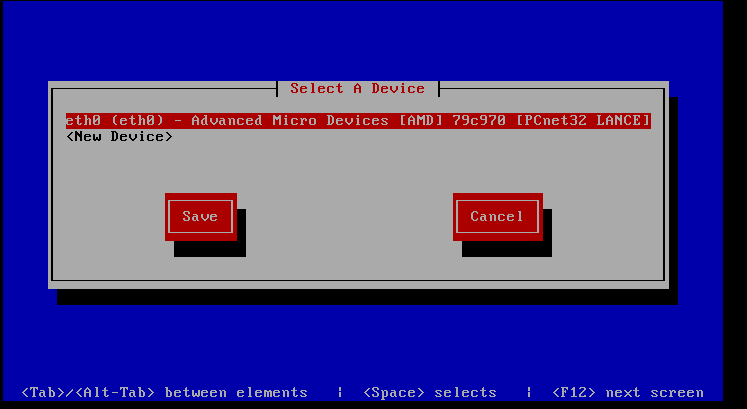
10.for this step, enter
11.according to ip result, manually input the ip as below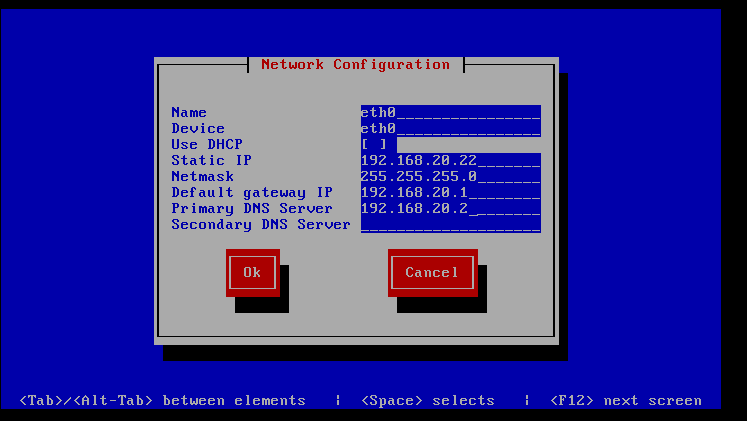
12.Then choose save and quit
Then input
service network restart
However, I had a problem with eth0, So I need to work on eth0 first by input
ifup eth0
ifconfig
if it does not work, then try the following
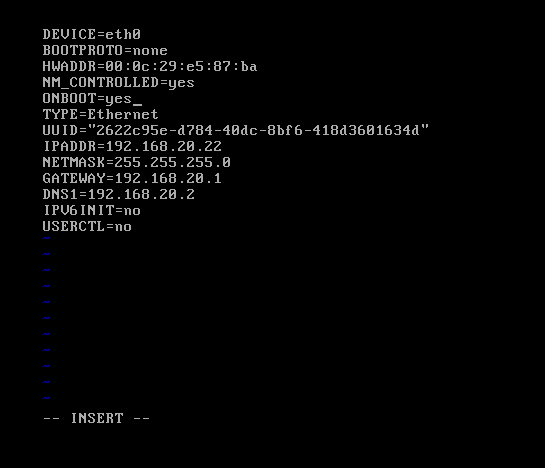
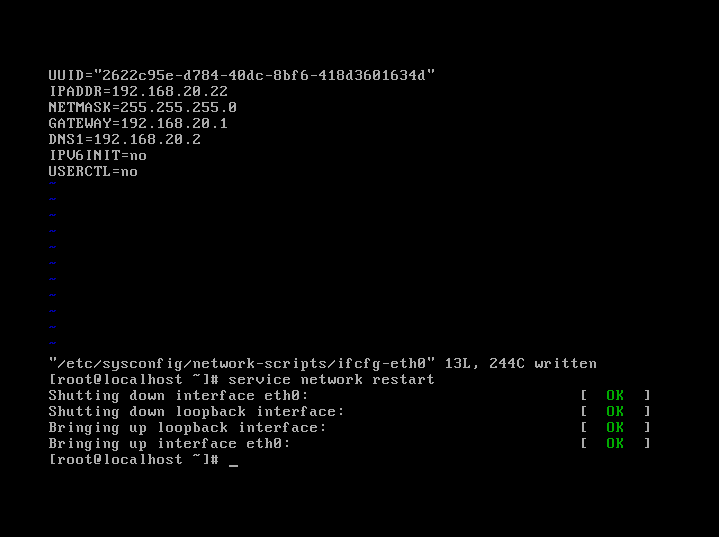
vi /etc/sysconfig/network-scripts/ifcfg-eth0
to modify the eth0 as below, be careful there is a space between vi and /
You will see the picture below, input i to edit, change the “ONBOOT=YES”, then ESC, input :x to save.
Then try below, finally it works well.
service network restart
After submitting the ios apk to Apple store, I got the message from Apple mentioned Apple Store Guideline 2.1—running iOS 10.3.3 on Wi-Fi connected to an IPv6 network.
The solution is replacing all the api with domain name and test it under ipv6 in local network.
The first step is registering a domain name for our App.
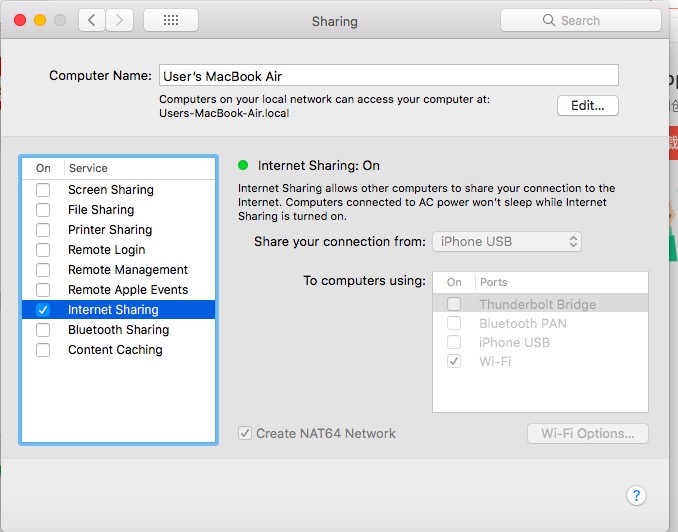
Then I will explan how did we set up an ipv6 network with iPhone
Connect your iPhone with your Mac
Eable the hotpot in your iPhone and choose and choose through Only USB
Connect to your iPhone wifi in Mac
Go to reference, and click the “option” and open “sharing” at the same time

1.Go to the Nop.Web/Controllers/CatalogController. find the search action and set the searchinDescriptions to be true
IPagedList<Product> products = new PagedList<Product>(new List<Product>(), 0, 1);
           // only search if query string search keyword is set (used to avoid searching or displaying search term min length error message on /search page load)
           if (Request.Params["Q"] != null)
           {
               if (model.Q.Length < _catalogSettings.ProductSearchTermMinimumLength)
               {
                   model.Warning = string.Format(_localizationService.GetResource("Search.SearchTermMinimumLengthIsNCharacters"), _catalogSettings.ProductSearchTermMinimumLength);
               }
               else
               {
                   var categoryIds = new List<int>();
                   int manufacturerId = 0;
                   decimal? minPriceConverted = null;
                   decimal? maxPriceConverted = null;
                   bool searchInDescriptions = true;
                   if (model.As)
                   {
                       //advanced search
                       var categoryId = model.Cid;
                       if (categoryId > 0)
                       {
                           categoryIds.Add(categoryId);
                           if (model.Isc)
                           {
                               //include subcategories
                               categoryIds.AddRange(GetChildCategoryIds(categoryId));
                           }
                       }